Using Open Source Android Libraries for Game UI - IconPagerAdapter as a Game Select Screen
While UI is often the last thing a programmer thinks about when starting on a new project, it’s often the very first thing a user knows about your project. Why then don’t we all use the latest and greatest UI patterns? Perhaps many coders find visual design to be out of their domain, or perhaps they feel that the execution of the algorithms contained within their program are of paramount concern to users. Regardless of the reason, disgruntled users have started to leave once trusted programs whose interfaces have not kept up with the times. How then to update your app(or game!) to the newest visual hotness?
In this article I’ll be taking you through the creation of a dynamic game selection screen based on the excellent ViewPagerIndicator library by Jake Wharton. As always, you can follow along in code at the 5 Seconds GitHub repository. When you finish the article, you should be able to easily implement a icon-enabled view pager for your Android app or game.
- Open Source FTW
- Creating your Activity
- UI Layouts and Unobtrusive Advertising
- Creating your Generic Fragment with Saving and Loading of State Values
- Creating Your Adapter
- Putting it all Together – Instantiation
- Icing On the Cake – Title Music Loading
- Conclusion
Read on for the full article!
One of the great things about open source software is the proliferation of fresh UI design patterns throughout a reticent community of programmers. One excellent open source library that compliments Android’s view pager design is ViewPagerIndicator by Jake Wharton. It provides a tabbed visual indicator of where your user is in a flow of screens, has recently added a nice IconPagerIndicator, and is all the rage.
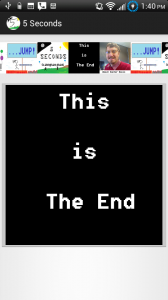
I’ll be using it to create a Game Select screen for the 5 Seconds minigame collection. Right now 5 Seconds consists of a combination of OpenGL and non-OpenGL games, and everything is highly compartmentalized with their own title screens and credits, theme music, etc. As such, a view pager (with a nice view pager indicator to provide some visual context) is a perfect UI paradigm for the game select screen.
First, you’ll want to include the ViewPagerIndicator library from GitHub into your project as a library project.
Creating your Activity
Your main activity in a view pager layout is essentially a skeleton which holds your top level references. As such, it can be fairly simple. This looks like:
<br></br>
// The game select screen is the main 'hub' of 5 seconds```
/**
* The Class GameSelectScreen.
*/
public class GameSelectScreen extends FragmentActivity {
/*
* (non-Javadoc)
*
* @see android.app.Activity#onCreate(android.os.Bundle)
*/
@Override
public void onCreate(Bundle savedInstanceState) {
super.onCreate(savedInstanceState);
setContentView(R.layout.activity_game_select_screen);
}
/*
* (non-Javadoc)
*
* @see android.app.Activity#onCreateOptionsMenu(android.view.Menu)
*/
@Override
public boolean onCreateOptionsMenu(Menu menu) {
getMenuInflater().inflate(R.menu.activity_game_select_screen, menu);
return true;
}
}
As you can see there’s not much too it. We’ll add in the instantiation of our fragments and pagers later, after we’ve created the UI layouts.
**[UI Layouts and Unobtrusive Advertising]()**
We’ll need two main layouts, one for the game select screen, and a generic one for each of the individual game screens. For your main game select screen you’ll need a standard View Pager from the Android support library, and a View Pager Indicator from the ViewPagerIndicator library. The code for 5 seconds game select screen looks like:
`<br></br><linearlayout android:layout_height="fill_parent" android:layout_width="fill_parent" android:orientation="vertical" xmlns:android="http://schemas.android.com/apk/res/android"></linearlayout>`
<com.viewpagerindicator.tabpageindicator android:id="@+id/gameSelectTitlePageIndicator" android:layout_height="100dp" android:layout_width="fill_parent"></com.viewpagerindicator.tabpageindicator>
<android.support.v4.view.viewpager android:id="@+id/gameSelectPager" android:layout_height="0dp" android:layout_weight="1" android:layout_width="fill_parent"></android.support.v4.view.viewpager>
For the generic layout that can be inflated for each of the games, you’ll want a large display area for the game title screen icon. If you are using advertising, you also may want to include it on this screen rather than on any of the game screens (seems like people are starting to hate in-game advertisement, but a menu advertisement feels like a fair compromise). This looks like:
[](http://www.hunterdavis.com/content/images/2012/12/pop-them-baloons-with-adverts-front-screen.png)
And the code is simply:
`<br></br><?xml version="1.0" encoding="utf-8"??><br></br><linearlayout android:layout_height="match_parent" android:layout_width="match_parent" android:orientation="vertical" xmlns:ads="http://schemas.android.com/apk/lib/com.google.ads" xmlns:android="http://schemas.android.com/apk/res/android"></linearlayout>`
<imagebutton android:id="@+id/gameTitleImage" android:layout_height="0dip" android:layout_weight="1" android:layout_width="match_parent" android:scaletype="fitXY" android:src="@android:drawable/btn_dialog"></imagebutton>
<com.google.ads.adview ads:adsize="BANNER" ads:adunitid="a150df41144503a" ads:loadadoncreate="true" android:id="@+id/adView" android:layout_height="wrap_content" android:layout_width="wrap_content"></com.google.ads.adview>
**[Creating your Generic Fragment with Saving and Loading of State Values]()**
You’ll need a Fragment class which can create fragment instances and inflate your game select screens. For a game select screen these fragments really only need to have four sets of basic functionality:
1. It must be able to generate instances of itself to return to the top level view pager
2. It should save and load its instance state using standard android lifecycle methods
3. It should display the game title screen image
4. It should allow you to click on the title screen image and load that activity
You can see below what the code looks like for 5 seconds. Note the use of Bundles during creation and onSaveInstanceState. This allows the system to restore the fragment to its previous state regardless of whether the android system dropped it out of memory.
</br>
package com.hunterdavis.fiveseconds.ui;```
import android.os.Bundle;
import android.support.v4.app.Fragment;
import android.view.LayoutInflater;
import android.view.View;
import android.view.ViewGroup;
import android.widget.ImageButton;
public class GameSelectScreenFragment extends Fragment {
private static final String KEY_TITLE = “GameSelectScreen:Title”;
private static final String KEY_IMAGE = “GameSelectScreen:Image”;
private String mTitle = “”;
private int mTitleImage = -1;
private View.OnClickListener mTitleOnClickListener;
public static GameSelectScreenFragment newInstance(String title,
int titleImageResource, View.OnClickListener onClick) {
GameSelectScreenFragment gameSelectFragment = new GameSelectScreenFragment();
gameSelectFragment.mTitle = title;
gameSelectFragment.mTitleImage = titleImageResource;
gameSelectFragment.mTitleOnClickListener = onClick;
return gameSelectFragment;
}
@Override
public void onCreate(Bundle savedInstanceState) {
super.onCreate(savedInstanceState);
if (savedInstanceState != null) {
if (savedInstanceState.containsKey(KEY_TITLE)) {
mTitle = savedInstanceState.getString(KEY_TITLE);
}
if (savedInstanceState.containsKey(KEY_IMAGE)) {
mTitleImage = savedInstanceState.getInt(KEY_IMAGE);
mTitleOnClickListener = GameSelectScreenResources
.getOnClickListenerForIcon(mTitleImage);
}
}
}
@Override
public View onCreateView(LayoutInflater inflater, ViewGroup container,
Bundle savedInstanceState) {
View gameTitleLayout = inflater
.inflate(
com.hunterdavis.fiveseconds.R.layout.generic_game_title_fragment,
null);
// set our title image and onclick if we’ve got em
if (mTitleImage > -1) {
ImageButton gameTitleView = (ImageButton) gameTitleLayout
.findViewById(com.hunterdavis.fiveseconds.R.id.gameTitleImage);
gameTitleView.setImageDrawable(getResources().getDrawable(
mTitleImage));
if (mTitleOnClickListener != null) {
gameTitleView.setOnClickListener(mTitleOnClickListener);
}
}
return gameTitleLayout;
}
@Override
public void onSaveInstanceState(Bundle outState) {
super.onSaveInstanceState(outState);
outState.putString(KEY_TITLE, mTitle);
outState.putInt(KEY_IMAGE, mTitleImage);
}
}
Creating Your Adapter
Now that you’ve got a generic fragment and a layout to inflate, you’ll need an adapter for the view pager which also handles the icon pager indicator. There is an excellent base example available in the ViewPagerIndicator library to get you started. You can see below how it turned out for 5 seconds. Note the use of a static method in a GameSelectScreenResources class to get the onClick method for a particular image. This allows us to grab the onClick for an image from other classes without instantiating an instance of the GameSelectFragmentAdapter. While the default example from Jake Wharton’s library keeps these resource constant values within the fragment adapter, in practice they are easily moved out to another class. I find having all the resources and their helper functions de-coupled from the fragment adapter helps to keep the game Selection metadata localized to one location.
<br></br>
public class GameSelectFragmentAdapter extends FragmentPagerAdapter implements<br></br>
		IconPagerAdapter {```

 private int mCount = GameSelectScreenResources.GAMETITLES.length;

 public GameSelectFragmentAdapter(FragmentManager fm) {
 super(fm);
 }

 @Override
 public GameSelectScreenFragment getItem(int position) {
 int screen = GameSelectScreenResources.GAMESCREENS[position % GameSelectScreenResources.GAMEICONS.length];
 return GameSelectScreenFragment.newInstance(GameSelectScreenResources.GAMETITLES[position
 % GameSelectScreenResources.GAMETITLES.length], screen,
 GameSelectScreenResources.getOnClickListenerForGameScreen(screen));
 }

 @Override
 public int getCount() {
 return mCount;
 }

 @Override
 public CharSequence getPageTitle(int position) {
 return "";
 }

 public CharSequence getTitleForPageAtPosition(int position) {
 return GameSelectScreenResources.GAMETITLES[position
 % GameSelectScreenResources.GAMETITLES.length];
 }

 @Override
 public int getIconResId(int index) {
 return GameSelectScreenResources.GAMEICONS[index % GameSelectScreenResources.GAMEICONS.length];
 }

 public void setCount(int count) {
 if (count > 0 && count

And here's the GameSelectScreenResources class:
</br>
public class GameSelectScreenResources {
</br>
public static final String[] GAMETITLES = new String[] {
</br>
“Pop Them Baloons”, “…Jump”, “Title Screen”, “Credits Screen”,
</br>
“About the Author” };
</br>
public static final int[] GAMEICONS = new int[] {
</br>
R.drawable.popxcolorbaloonsicon, R.drawable.jumpscreenicon,
</br>
R.drawable.fivesecondstitleicon, R.drawable.creditsicon,
</br>
R.drawable.abouttheauthoricon };```
public static final int[] GAMESCREENS = new int[] {
R.drawable.popxcolorbaloonstitle, R.drawable.jumptitle,
R.drawable.fivesecondstitle, R.drawable.creditstitle,
R.drawable.abouttheauthor };
public static OnClickListener getOnClickListenerForGameScreen(int icon) {
switch (icon) {
case R.drawable.popxcolorbaloonstitle: /* Pop X Color Baloons /
return new OnClickListener() {
@Override
public void onClick(View v) {
PopXColorBalloons.startPopXColorBaloonsScreen(
v.getContext(), 3 + (new Random().nextInt(2)));
}
};
case R.drawable.jumptitle: / dotdotdotjump /
return new OnClickListener() {
@Override
public void onClick(View v) {
DotDotDotJump.startDotDotDotJumpScreen(v.getContext(), 1);
}
};
case R.drawable.fivesecondstitle: / Title Screen /
return new OnClickListener() {
@Override
public void onClick(View v) {
}
};
case R.drawable.creditsicon: / Credits Screen /
return new OnClickListener() {
@Override
public void onClick(View v) {
}
};
case R.drawable.abouttheauthor: / about the author */
return new OnClickListener() {
@Override
public void onClick(View v) {
}
};
default:
return new OnClickListener() {
@Override
public void onClick(View v) {
}
};
}
}
}
Putting it all Together - Instantiation
Remember how empty our top level game select screen activity was? It’s now time to fill that in. Not to worry, as we’ll only need to add some instantiation around our view pager and view pager indicator. First, add some member variables to hold the pagers.
<br></br>
	// view pager members<br></br>
	android.support.v4.view.ViewPager mPager;<br></br>
	TabPageIndicator mIndicator;<br></br>
        GameSelectFragmentAdapter mAdapter;<br></br>```

Next, instantiate them in the onCreate method.
</br>
@Override
</br>
public void onCreate(Bundle savedInstanceState) {
</br>
super.onCreate(savedInstanceState);```
setContentView(R.layout.activity_game_select_screen);
mAdapter = new GameSelectFragmentAdapter(getSupportFragmentManager());
mPager = (android.support.v4.view.ViewPager)findViewById(R.id.gameSelectPager);
mPager.setAdapter(mAdapter);
mIndicator = (TabPageIndicator )findViewById(R.id.gameSelectTitlePageIndicator);
mIndicator.setViewPager(mPager);
}
Icing On the Cake - Title Music Loading
Now that you’ve got your view pager and icon-enabled view pager indicator working, why not add a little pizzazz to your game select screen? Adding an onChange listener to play each game’s title screen music during selection is as simple as:
- Adding an onChangeListener callback to your view pager. Start with an anonymous implementation like:
<br></br> mIndicator.setOnPageChangeListener(new OnPageChangeListener() {<p> @Override<br></br> public void onPageSelected(int arg0) {</p><p> }</p><p> @Override<br></br> public void onPageScrolled(int arg0, float arg1, int arg2) {</p><p> }</p><p> @Override<br></br> public void onPageScrollStateChanged(int arg0) {</p><p> }<br></br> });<br></br></p> - Add a static method to your GameSelectScreenResources class which can provide the correct music ID. For 5 seconds the code is:
<br></br> public static final int[] GAMETITLEMUSIC = new int[] {<br></br> R.raw.popxcolorballoonstitletheme, R.raw.compressedtitletheme,<br></br> R.raw.compressedtitletheme, R.raw.fivesecondscredits,<br></br> R.raw.popxcolorballoonscreditstheme };<p> public static int getMusicForPageAtPosition(int position) {<br></br> return GAMETITLEMUSIC[position % GAMETITLEMUSIC.length];<br></br> }<br></br></p> - Creating a method for your onPageSelected callback to play music based on which page was selected. For music playback, I use a reference to a class level Easy Audio Manager instance. The code for this is simply:
<br></br>
 /** The audio manager. */<br></br>
 EasyAudioManager audioManager;<p>	public void playGameThemeMusic(Context context, int pageId) {<br></br>
     if (audioManager == null) {<br></br>
         // create the audioManager<br></br>
         audioManager = new EasyAudioManager(this, null);<br></br>
     }<br></br>
     if (audioManager.songPlaying) {<br></br>
         audioManager.pauseSong();<br></br>
     }<br></br>
     audioManager.setSong(<br></br>
             context,<br></br>
             GameSelectScreenResources.getMusicForPageAtPosition(pageId<br></br>
                     % GameSelectScreenResources.GAMETITLEMUSIC.length));<br></br>
     audioManager.playSong();<br></br>
 }<br></br></p>
Conclusion
And that’s that! Now you’ve got a nice implementation of a game select screen, and a great starting point for adding all sorts of polish to your game select. As always, you can check out the open source code from the 5 Seconds GitHub page.
