Basic Skeletal Animation: From Paper to Math to Code, Part 1
Textures are heavy. Bloat-y. They weigh down your apps, and consume memory. Sometimes you just want to efficiently animate something procedurally. One useful technique to have in your bag of tricks is that of basic skeletal animation. In this article series, I’ll run you though the basics of 2-d skeletal animation. I’ll be implementing this as part of a variant of the popular ‘run as far as you can’ games on the Android platform using AndEngine/OpenGL as the rendering back-end. Those more interested in reading code can follow along at the 5 Seconds GitHub commit history. At the end of this series, you’ll be able to implement basic skeletal animation in the language of your choice. I’ll be using Android/Java/*OpenGL as the pedagogical example, but the code should port easily to other platforms.
*Note that if you’re following along in code, you’ll see the original game engine was a basic multi-threaded game loop/render loop combo I created for this article series (any 5-seconds games using OpenGL would inherit from these base classes I cooked up). After a few months of some awesome projects at work taking up my time, I switched it out to andEngine. That said I’ll still be running through a bit of basic engine design. If you’re looking to get a feel for basic Android game programming without the OpenGL and much of the multi-threaded bits, I’d recommend reading through the source code of the ‘Pop X Color Balloons’ game contained within the project. As always, you can try the code out at anytime on your own Android device because everything about it is open sourced on GitHub. Eventually I’ll make this game series available on the Play store as a compilation game (think Wario-Ware), Until then, GitHub will be the place to grab the project.
Skip Ahead:
Let’s Talk about “Boundage”
Prequel: Choosing your Draw Ordering, and The Importance of The Separation Between Game Logic and Game Graphics
Ensuring Thread Concurrency and Avoiding Deadlocks
Baby Steps: Step One: Start with an Arm is an Arm is a Leg?
Baby Steps: Step Two: Now Form The Head
Some Thoughts On Procrastination
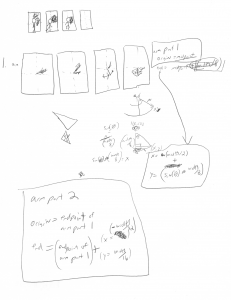
For me, it all starts with an off-the-cuff sketch on paper. This often occurs while I’m doing something else with my family. Why burn your eyes out doing design work at your laptop? A good design can be translated from sketch to mathematics on paper. When you’ve got a good solution mathematically, then you can consider the implementation details. When it’s time for coding, you’ll know it.
| [](http://www.hunterdavis.com/content/images/2012/12/page17.png) | [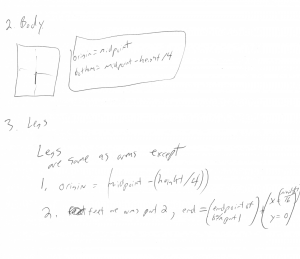](http://www.hunterdavis.com/content/images/2012/12/page2.png) | [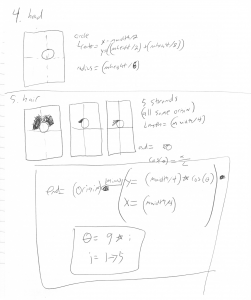](http://www.hunterdavis.com/content/images/2012/12/page3.png) |
How then, to convert your sketches from visual to mathematical principals? One useful technique is to think about the movement of your skeleton one part at a time. A problem is often easier to solve when you group its components logically. For humanoid movement (i.e. running), you can think of each discreet movement as a series of orientation changes occurring from the base of the part to the end of the part along that parts axis. Calculating the new position can be as simple as iterating a variable over a sin function. Remembering your basic geometry formulas (SOHCAHTOA) will help greatly in the mathematics. I find that drawing a bounding box around your part sketch helps greatly in the translation between form and function. You can design the size and movement of the part (i.e. the length and swinging of an arm or leg) relative to the size of the box (i.e. your arm is 9/20 the length of your body). When it’s time to write the code to draw each individual part you can simply reference the relative size and position of the bounding box you want the part drawn in and not have to worry about scaling texture assets to your screen’s resolution. Now that you’ve got a good feel for the basic skeletal motion, let’s get down to some implementation specifics.
Prequel: Choosing your Draw Ordering, and The Importance of The Separation Between Game Logic and Game Graphics
When constructing a basic skeletal model in code, you’ll want to think of the view perspective the user will be viewing your model from. From the view perspective of the user, (mentally) draw an invisible line to infinity through your model. The order in which the line hits the parts is your reverse draw order. So for a ‘running man’ model in 2-dimensions, the user will first see the right arm and right leg and hair, followed by the head and body, and lastly the left arm and left leg. So your draw order is the reverse. If you’re hand-rolling your graphics generation code, your draw function will first draw the left leg and left arm, followed by the body and head, followed by the hair, right arm, and right leg. You’ll notice that in the drawings the position of the left arm is calculated based on the position of the body. This is where good separation of components comes into play. If your game engine tries to do double duty and updated the position of objects during your graphics thread you may run into trouble. No, not trouble in the sense that multi-core processors are the norm, and without multi-threading you’re probabbly wasting a lot of that power. This is a design concern (at least for purely 2-d games). Remember that the player sees the left arm last, so it should be drawn first. If you’re not animating in 3d (where a z-depth makes this point irrelevant) the calculations to draw the left arm become much more complex because of the relative positioning of the arm. You would have to first calculate the position of the body, (and cache that value for later use) then use the body’s position to calculate the position of the left arm. As a conscientious game designer, your game engine separates the game updates from the graphics updates and allows you to calculate the position of objects in whatever fashion is most efficient (or easiest to understand, i.e. for readability).
Ensuring Thread Concurrency and Avoiding Deadlocks
As this is a game engine, we’ll want each piece of data that is used by multiple threads to be thread-safe and synchronized over the smallest portion of code possible. The fewer ‘locks’ your threads have to go through to execute a piece of code the better. While CPU locks only take 17ns to unlock, a thread in a wait cycle could wait for milliseconds!. Just be careful with your race conditions and make sure you are locking over the final shared data item, not any functions used to calculate this item. (i.e. only synchronize class functions which are pure getters and setters.) For more complex functions be sure that you synchronize the final product, not any intermediate or thread-local data items. For body parts you’ll generally be calculating a couple of XYZ position tuplets. Here’s an example tuplet class from my game utilities library. You’ll note that it has synchronized get and set functions, so it’s thread safe. This does not mean however, that you don’t have to be safe and think about your thread synchronization carefully. Consider the basic example of a set of functions which get and set the start and end values of an upper arm segment. Here is the function to get the thread safe tuplets:
public synchronized XYZTuple getUpperLimbEnd() { return mUpperLimbEnd; }
And here is a thread safe function to set that data:
public synchronized void setUpperLimbEnd(XYZTuple upperLimbEnd);
The above functions presented are thread safe, in that the data contained therein will not be read while it is being written to. Unfortunately that does not mean you cannot use them in a thread unsafe way. Consider the case of a drawing thread reading the values, and a game engine thread generating them. If the game engine thread updates the end value immediately after the drawing thread reads from the start value, the drawn segment will be incorrect. Over a very large model, this kind of thread concurrency issue could lead to visual artifacts, with lines jutting out of nowhere or warped textures. A more sensible set of functionality would be to store and return the values as a pair in a synchronized method as show below. While you will lose some time initially during creation, you’ll save an additional function call each time you get the data and help prevent thread sync problems.
public synchronized void setLowerLimbPosition(Pair<xyztuple xyztuple=""> startToEnd) { mUpperLimbStartToEnd = startToEnd; } </xyztuple>
Always remember that thread synchronization (in Java) works over the class level. Knowing this, we can plan our abstractions such that highly entwined data (such as the start and end points of a line) can be surrounded by a thread safe mutex (such as the ‘synchronized’ keyword in Java). With a little forethought, you can synchronize your threads at the right level of abstraction and prevent (some) nasty graphical bugs from occurring. Be warned, use thread synchronized methods only when absolutely necessary (i.e. protect data items.) Synchronization locks steal precious execution time from your code, and bugs that occur in parallel logic can be orders of magnitude more complex than for single threaded programs.
**Baby Steps: Step One: Start with an Arm is an Arm is a Leg? **
When generating your skeletal model, consider the logical abstractions you’ll use. For a humanoid, it’s likely that your arms and legs are constructed in a relatively similar manner. Each arm has an upper section, lower section, and hand. Likewise the leg has an upper section, lower section, and foot. Both arms and legs can therefore be represented by the same abstract ‘limb’ data structure, and we’ll save ourselves some code duplication. While it may seem a bit of overkill to implement a full set of OOP structures to represent the body parts, it’ll pay off when we get to game implementation.
**Baby Steps: Step Two: Now Form The Head**
Like Voltron before us, now that we’ve got the body, arms, and legs put together it’s time to logically form the head. We generate our neck and face based on the uppermost position of the body, as well as a size we calculate based on the overall bounding box size. That rounds out our logical abstractions for our skeletal model. Next time, we’ll actually animate that skeleton, and I’ll talk about some tips and tricks you can apply to your animation to bring it up to production quality (hair, anyone?). *Hashtags 3D and faux-3d, skinning, “faking” and dynamic textures *(can you just say “hashtags”? … whatever.)
Some Thoughts On Procrastination
Those of you who have been following along with the GitHub repository know that about 3/4 of the way through writing this article I stopped updating. Nothing happened for 3 solid months on an article that was original just a weekend write-up. Why? There are many reasons, certainly I was busy at work and at home, but I think at the end of the day it boils down to procrastination, and a (perhaps not so) profound statement about programmers:
*Sometimes, Code Duplication is Procrastination *
Does this happen to you? It took a while before I realized the pattern I myself was falling into. Every time I started a game project, I’d implement some abstract game logic and the basis for the game, then spend a great deal of time re-implementing graphics functions that perfectly good open source game engines implemented long ago. At the end of the day hand-rolling all my shaders, openGL calls, texture caching, etc is just code duplication. One pro:tip I can give:
Unless you’re writing an API, don’t write convenience methods for use cases that don’t exist yet.
Unlike my Audio Manager library, I can’t claim to bring anything more to the table (in terms of implementation, or content) than the authors of these engines. Likewise, for pedagogical reasons it makes more sense for me to use a library which is likely to be most useful to my audience, and have the longest shelf-life. (Note that while I DO have a mobile Unity developer license, I prefer to use open source software). At any rate, I found myself falling into this common trap yet again when working on …Jump. When I picked the project and this article back up recently, I decided to scrap the openGL work that I had written, swallow my “pride”, and switch to AndEngine.
And you know what? It’s not bad! The GLES2 branch runs fine in an emulator. I had a basic scene set up in just a few minutes. My existing logical abstractions still hold. In the end, the vast majority of the first article was still relevant without revision. In terms of integration with existing code there hasn’t been any issue with my game selection logic, title or credit screen logic, or audio manager library. Even better, it means that future articles in the series can be dropped into your production AndEngine code without any hassle, or even used as the basis for your first AndEngine game. Who knows, perhaps I’ll even try out it’s audio manager classes. Stranger things have happened!